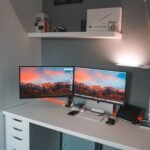
Your Small Desk Isn't the Problem.
At some point, your desk stops feeling like a workspace… and starts feeling like a pile. Your notebook is half under your keyboard, your cables are pushing things toward the edge, and you keep moving the same items around just to find room to work.
And the frustrating part? You’re not even adding new things. There’s just nowhere for anything to go, so it builds up.
Here’s what most people get wrong: you don’t need a bigger desk, you need better storage around it.
In this guide, you’ll learn how to add storage to a small desk setup using simple upgrades that create space without making your desk feel crowded.
Table of Contents
Some links here are affiliate links. They cost you nothing extra and help support the site. I only ever link to things I’d actually use myself.
How do you add storage to a small desk?
The best way to add storage to a small desk is to declutter first, then create layers using vertical storage (shelves, pegboards), under-desk organizers (drawers, trays), and compact desktop accessories. This lets you store more without using extra floor space or replacing your desk.
Why do small desks feel cluttered so fast?
Small desks don’t give you room to hide mistakes. Everything is visible, so when an item doesn’t have a clear place, it just piles up where you can see it. You’ve probably watched it happen:
- cables pushing things backward
- notebooks stacking behind your keyboard
- random items living “temporarily” on the side
But the real issue isn’t space, it’s a lack of structure. When nothing has a home, everything ends up on the desk.
How should you prepare your desk before adding storage?
Before adding storage, you need to clear space and define what actually belongs on your desk. Otherwise, you’re just organizing clutter instead of fixing it.
Step 1: Do a quick declutter pass
Don’t overthink this one. Set a timer for 10 to 15 minutes and pull the obvious dead weight:
- duplicates
- unused items
- dead tech
You’ll usually clear a surprising amount of surface just doing this, before you buy a single thing. And if the deeper problem is that your desk has no drawers to store any of it, here’s how to organize a small desk without drawers.
Step 2: Define your zones
This is where the setup starts to make sense. Split your space into three:
- Immediate zone → what you use every day
- Near zone → under-desk and wall storage
- Far zone → everything else
Once you do that, you stop trying to cram everything onto the desk itself. Reality check: if everything has to be within arm’s reach, the desk will always feel crowded.
Step 3: Measure before you add anything
This is the step that saves you from bad purchases. Check three things before you buy:
- desk width and depth
- the space under the desk
- the wall space above
Most storage problems don’t come from a lack of options. They come from buying something that doesn’t actually fit.
How to add storage on a small desk without making it feel crowded
The goal isn’t to add more. It’s to add layers.
Use a monitor riser to create a second level
This is one of the simplest upgrades on the list. A compact monitor riser, with or without storage, lets you:
- store your keyboard underneath
- slide notebooks below
- free up your main surface
That gives you back the space under the screen, enough for a keyboard or a notebook to slide beneath it. If you want the version that doubles as storage, the gianotter Wood Monitor Stand Riser adds a drawer, two pen holders, and a shelf right under your screen. It sits on the desk with nothing to install, and the single size stays compact.
And if you want to go further and gain a true second shelf without replacing your riser, a clamp shelf gives you the same result with more flexibility, here’s how to pick one that fits your desk.
Add small organizers (but keep them controlled)
Organizers can help, but on a small desk, too many of them just make things worse. Stick to one or two compact ones that group your daily items without spreading across the surface:
- compact drawer organizers
- minimal pen holders
- small stackable trays
And keep them off-center. The middle of the desk should stay clear.
Use clamp-on accessories to free surface space
This is one of the most underrated moves. Clamp-on accessories hang off the edge instead of sitting on top:
- clamp-on headphone hooks
- side trays
- cup holders
They don’t take space. They create it.
How to use under-desk space for hidden storage
The space under your desk is usually wasted, and it’s one of the best places to add real storage. Clamp-on drawers, cable trays, and small organizers all let you store things out of sight while keeping the main surface clear.
Add under-desk drawers
If your desk has no drawers, this is the upgrade I’d start with. I’ve added under-desk drawers on my own setup, and what they’re really good at is swallowing the things you don’t reach for every day, so they stop living on the surface.
Use:
- clamp-on drawers (no drilling)
- or slim under-desk trays
They’re perfect for:
- cables
- small tools
- the random accessories that always pile up
Move cables and power off your desk
It sounds basic, but on a small desk, where the cables go decides how much room you actually have.
Use:
- under-desk cable trays (metal or mesh)
- Velcro ties and clips
And something useful happens once they’re routed: you don’t just hide the cables, you get the space back.
Add mobile storage under one side
If you have a little floor room to spare:
- a narrow rolling drawer unit
- or stackable storage
Slide it under the desk and pull it out only when you need it, so it never eats into your work area.
How to use walls and nearby space to expand storage
If your desk is full, the solution isn’t the desk anymore, it’s the wall behind and beside it. Once you run out of surface, vertical space becomes your main storage extension. Shelves, pegboards, and slim furniture let you store more without crowding the desk itself.
Add floating shelves
One shelf can change everything. Use it for:
- books
- accessories
- the things you don’t need within reach
Keep the heavier items lower. And if one shelf helps, a set helps more: the BAYKA Floating Shelves come in a set of three, enough to move books and supplies off the desk and onto the wall. Just check what you’re drilling into first.
Use pegboards or wall grids
A pegboard or wall grid works especially well if you have no drawers, or you need storage that adapts as your setup changes. On one, you can hang tools, hold cables, and keep small things visible but organized, all off the surface.
Create a “storage zone” next to your desk
Sometimes the best move isn’t on the desk at all. A slim bookshelf, a ladder shelf, or a narrow cabinet beside the desk gives you real storage without touching the work surface:
- slim bookshelf
- ladder shelf
- vertical cabinet
Then keep your daily items on it low and close, and push the occasional stuff higher or further away.
Tools that make small desk storage easier
You don’t need more storage. You need smarter storage. A few compact tools, like monitor risers, under-desk drawers, pegboards, and small organizers, can add real capacity without making the desk feel crowded.
What actually works
- monitor risers with storage → create a second layer
- under-desk drawers → hidden storage
- pegboards / wall grids → vertical expansion
- stackable organizers → controlled storage
- cable trays → reduce clutter
How to choose the right ones
Ask yourself:
- does it fit my desk size?
- does it replace something, or just add more clutter?
- can I remove it easily if I need to?
If the honest answer is no, skip it.
Common mistakes when adding storage
Adding too many organizers
More storage isn’t automatically better. Past a point, every extra organizer just becomes one more thing to look at.
Ignoring legroom
If your knees hit something under there, it’s in the wrong place. Storage under the desk can’t cost you your legroom.
Buying before decluttering
Storage doesn’t fix clutter, it hides it. Declutter first, then buy for what’s actually left.
Mixing too many styles
Too many colors, shapes, and materials make a small space feel busier and smaller. Keep the finishes simple.
Example setups you can copy
Minimalist laptop setup
- monitor riser
- one small organizer
- clamp-on drawer
- pegboard above
Everything lifts off the surface, so the desk stays clear enough to actually work on.
Work-from-home setup
- monitor arms
- under-desk cable tray
- rolling drawer
- shelf above
Enough storage for a full workday, with nothing competing for your keyboard space.
FAQ
How do I add storage if I can’t drill?
Use clamp-on and adhesive solutions: clamp-on drawers and shelves, adhesive raceways, and stick-on organizers. They hold well, and they come off cleanly as long as you check the weight rating and test any adhesive on a hidden spot first. That makes them the renter-friendly route, no drilling required.
Where should paperwork go?
Off the desk surface. Keep only the current week’s papers in a vertical tray or a nearby drawer, upright rather than stacked flat, and file or recycle the rest. Loose paper without a dedicated home is what quietly takes over a small desk.
How much should stay on my desk?
Only what you use every day: usually your laptop or keyboard and mouse, one notebook, and maybe a single organizer. Everything used weekly or less belongs under the desk, on the wall, or in nearby storage, not on the surface.
Do monitor arms help with storage?
Yes, indirectly. A monitor arm lifts the screen off the desk and clears the footprint a stand would take, which opens up the space underneath for a keyboard, a tray, or a small organizer. It buys you surface rather than being storage itself.
How do I keep it clean long-term?
One rule does most of the work: if something doesn’t have a place, it doesn’t stay. Give every daily item a defined home, and do a two-minute reset before you leave the desk so nothing has a chance to accumulate overnight.
Make space where there was none
Adding storage to a small desk isn’t about fitting more in. It’s about making space where there wasn’t any. Start with one area:
- your desk surface
- under the desk
- or the wall
Improve that one, then move to the next. And once everything has a place, the desk stops feeling small and starts feeling intentional.
Storage is just one part of the puzzle. If you want to see how all the pieces fit into one coherent setup, here’s the guide that connects everything.